


- All products in stock
- 100% accurate prices
- 3000+ terraces built!
- Delivery within 3 days
MDS TV
Installation of a terrace. Where to start?
It’s best to watch the three videos above and you’ll be off to a great start!
Installing a terrace is a responsible process that requires knowledge and proper preparation. The professional team of “MDS terrace” shares their experience to make the installation of the terrace a pleasant weekend job. What steps do you need to take to make the patio installation process go smoothly?
- Decide what kind of terrace you want ( Expert advice and MDS TV will help you ).
- Calculate the required amount of materials (use the “MDS terrace” calculator ).
- Buy terrace boards , screw foundations and other accessories in the “MDS teras” online store.
- If you need a Master to install your terrace, contact us by e-mail. by mail: info@deckpro.eu or fill out a request .
- Would you like an individual consultation? Contact by phone: +370 666 11146 or e-mail by mail: info@deckpro.eu. We will be happy to answer any questions.
Simple and clear installation instructions for a typical wooden terrace
Setting up a small, simple terrace is not very difficult. Of course, if you do it yourself, it will take you a little longer than if you entrust this work to professionals. But if you are serious, don’t delay and let’s get started.
Start of work
Installing a terrace starts with design. First, measure your yard and clearly decide where your wooden deck will be. It is very important to pay attention to its height, because the structure will depend on it. The absolute majority of craftsmen choose a double frame construction – it is more stable, requires fewer foundations, and the work is faster. We will describe how to build a low terrace up to 0.5 meters high. It is important that it is more than one meter away from the neighbor’s house or land area. In this way, you will avoid disputes and ensure compliance with all fire protection regulations.
Materials and tools required
Tools needed for terrace installation:
Shovel.
Equipment for screwing in screw foundations (it is also possible to screw in manually) or Earth drill and mixer, if the foundations are concrete.
Saw (we recommend an electric circular saw, but a manual one may also be necessary).
Spinner.
Crosscut saw.
Hammer.
Spirit level or rotary laser for accurate height measurements.
Roulette.
Campaign.
Typical materials required for the installation of a wooden terrace:
Screw foundations.
Geotextile and gravel.
Lower frame 45×95 mm (uncalibrated 50×100 mm ).
The upper frame – lugs 45×70 mm ( uncalibrated 50 ×75 mm ).
Boards for terraces 28×120 mm
Boards of other dimensions for the terrace perimeter and railings
Wood screws for wooden frame – construction.
G-tape protection tape.
CAMO wood screws for terrace boards.
WOCA oil for terrace boards.
Terrace installation Stage 1 / Measurements
Let’s start with accurate measurements. First, let’s clear the place where the terrace will be. Then let’s determine at what height we will install it. The height of the building’s doors must be taken into account. It is important that the terrace is not too low, as additional stairs from the building will be required. The most ideal option is level with the floor of the building or one step lower than the floor of the building. Once you know the final height of your terrace, you can also calculate at what height the screw piles should be screwed in. For example, boards 28 mm, upper frame 70 mm, lower frame 95 mm. Total 193 mm. Hence the formula is:
The height of the entire terrace sandwich is 193 mm. Subtract this size from the highest point of the deck, which is the top of the decking board against the wall, and you’ll get the piling support point. Add a few more centimeters for adjustment, so ±223-243mm should be subtracted from the highest point
A spirit level or rotary laser will help you determine the required heights.
Terrace installation Stage 2 / Foundations

The lower plane of the terrace is already known – its height, length and width are clear. Let’s move on to other works – installation of foundations. Foundation piles with a depth of ±80 cm are recommended (preferably below the frost level), and LRS art. stipulates that 80-120 cm deep foundations are required for buildings of small architecture in Lithuania. Foundations Arranged in rows every 1.2 meters parallel to the laying direction of the terrace floor.
The piles in each row are also concreted every 1.2 m. So, if the length of your terrace is 3 meters, you will need at least 3 foundation piles in each row (considering that the beams at the edges will protrude beyond the pile by up to 30 cm). If the terrace is larger, calculate accordingly. The distance between the poles themselves in a row and rows can be approximately equal or divided proportionally. The stronger the base, the more weight the terrace can withstand and the swaying is reduced.
IMPORTANT: the general rule is that you should try to install the poles at a distance of 1.2m in the direction of the row of poles and at the same distance of 1.2m between the rows (don’t underestimate the minimum deviations). By keeping such distances, you will hit practically all the most popular dimensions of the structure. Another important rule is that the distances for the installation of piles depend on the structure, not on the poles themselves, so if the structure is higher, for example 45×145, and therefore more resistant to bending, you will be able to install poles less often.
Before screwing in screw piles or drilling holes for concreting, immediately mark all pile points on the plane of the terrace.
Pay attention to the land area under the terrace. From now on, it will not be used, but it will receive moisture, so weeds and grass can grow. Before installing the frame and rotating the terrace boards, lay the geotextile under the terrace and press it (with stones, sand, even better crushed stone) so that you can later bury its edges at the edges of the terrace. This will ensure that the grass does not seep through the tables.
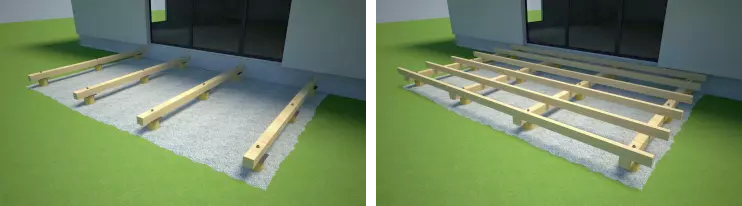
Stage 3 / Support beams
We install support beams 45×95 mm on long threads embedded in concrete or screwed into M-type screw piles (use U-type piles if this is more convenient for you). After drilling the holes in the screws, we put the screw through the screws and place it on the washer, which we screwed on before. We tighten the screws with nuts from above, thus compressing the beam. Do not forget that metal parts should be galvanized or stainless steel. Otherwise, after receiving moisture, they will start to rust and may break over time.
A dimension of 45×70 mm (or 45×95 mm) is often used for lugs/loungers, depending on the span and height allowed. Start installing them in the opposite direction of the lower points, it is best to move the first one away from the second lag by about 100 – 200 mm to control the possible curling of the boards, and then every 400 – 450 mm (centers). When installing at such distances, you will be sure that the terrace will be strong and stable, and the boards will not sag or rotate due to changes in temperature and humidity. It is important to note that the distance between the rafters is usually specified by the board manufacturer, so pay attention to their instructions.
Lags can be up to 30 cm longer than the last lower beam (to overlap). After installing the boards and adding the last one, it will be clear what length to cut the lags so that the terrace ends with a “healthy board”. Later, it will be possible to attach the covering wide board from the side so that the structure is not visible. Fasten the shutters to the lower frame with wood screws, e.g. 6x150mm.
IMPORTANT: the joint between the upper lagging and the lower part of the board is the most susceptible to rot, so it is recommended to cover the upper lagging with a protective lagging tape.
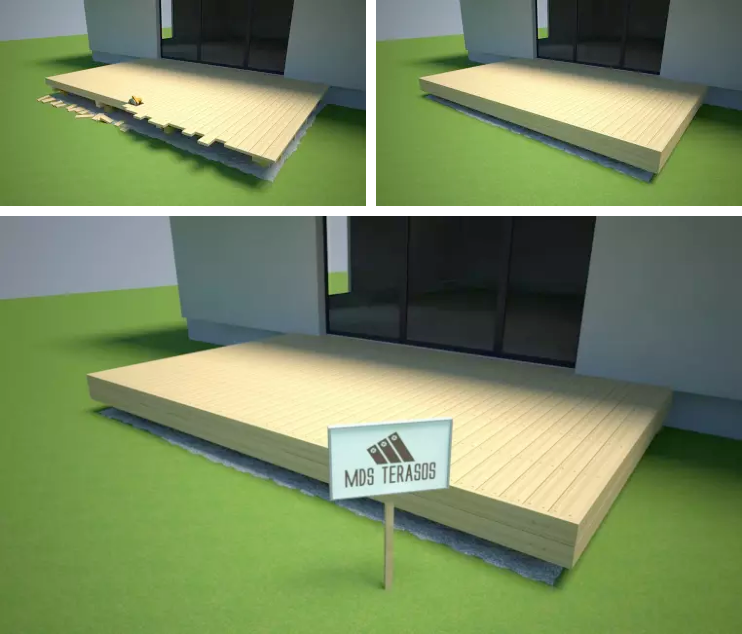
Stage 4 / Installing the terrace floor
Spaces of 4-6 mm should be left between the boards so that water and moisture do not accumulate on the terrace. Also, the boards should have room for “walking” during seasonality. If the boards are pine and very wet, a smaller gap of 2 mm can be made. As the boards dry, the gap will increase. With the help of modern equipment, boards can be installed so that the fasteners are not visible. Special tools are used for this, which allow wood screws to be screwed from the sides of the board leaving the heads in the gaps, e.g. CAMO tools .
The boards are of regular shape, so the gaps will be even on one side and on the other (of course, there are warped boards). It is best to install the boards perpendicular to the house, and with the help of the structure to form a slight slope with the length of the boards of about 5-10 mm per meter, so that the water drains from the terrace boards. Also, when choosing boards, it is best to avoid jointing the boards, as these are susceptible to rotting but aesthetic knots.
It is best to use an invisible fastening system, such as CAMO, to fix the deck boards so that the fixings of the deck boards are not visible.
Leave the edges of the terrace boards slightly longer than the edge of the lag. You won’t always be able to cut accurately and flatly with a cross saw, so once all the boards are attached, the ends can be leveled much more accurately with a circular saw. Don’t forget that you can always screw on the side board, which will hide the substructures.
Stage 5 / Stairs and railings
Decide where you want to make the stairs, if there is such a need. When the terraces are very low, there is often no need to install stairs. If the terrace is higher, you can make steps. Take 50×200 mm thick boards and cut out “crocodile teeth” on their sides – parallel triangles to which you will later attach the steps.
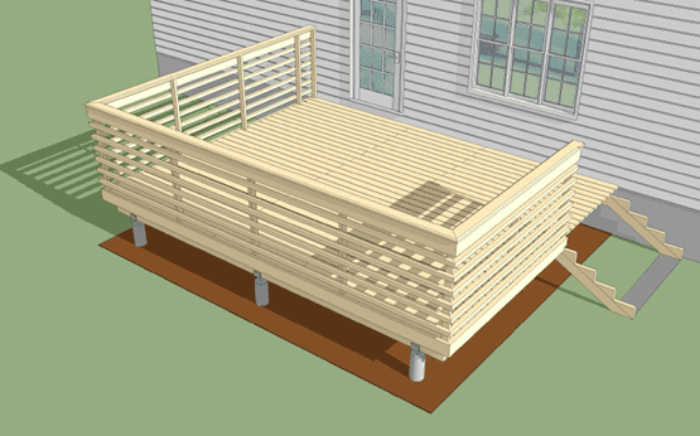
Screws or piles should be concreted under the stairs to prevent the stairs from sinking into the ground. Railings are also not a necessary attribute of the terrace, but if the terrace is high, you cannot do without them. After all, people will be constantly bustling on the terrace, and a fall even from a 50 cm high terrace can result in serious injuries. Fasten the railing supports to the dormers. We recommended making them slightly longer than the end of the row of pole holders. Simply cut the deck edge board to the support board and attach the railing support. It can be strengthened with crossbars, which you can hammer on the terrace table itself. It remains to place the railing of the desired structure on the support. We recommend doing this from 30×120 mm boards – one is fixed on top, the other – from the outside, so that it touches the edges. Handrails can be equipped with additional protection. For this, you will need to additionally nail 50×50 mm dots – at least one exactly in the middle, measuring from the top of the railing to the plane of the terrace boards. More is possible, but you need to evenly distribute the distances from one cross board to another. It doesn’t have to be pegs – it can be other boards or metal rods.
That’s it, your terrace is built!
Do you want your terrace to last a long time? We recommend giving it some attention and funds every year and covering the wood with a special outdoor oil.
Individual terrace calculator
Free consultation
Do you have questions, would you like to receive an individual offer?